
Today I’m sharing another post on How to take GREAT Backlit pictures. It can be challenging, but with the tips below, you will be well on your way. A lot of you started with me on this blogging journey for the photography tips. I shared so many, I got burned out, my brain got fried! I’ve traveled and held many workshops all over the country, and working on my workshop on video RIGHT NOW for those that want to learn more hands on.
My interests have expanded into sharing so many other things besides photography, but I’m going to try to share more photography. My goal is once a week to share photo tips, whether by me, or my trusty photography friends. I’m writing once a month for the New York Institute of Photography, and I’ll share those posts as well on my page, with a link to the full article, as I’m doing today. Be patient with me, and let me know in the comments something you’d like me to talk about (photography wise) that I haven’t already covered in my Photo Tips Section.
I get lots of questions about tips on Shooting backlight images, and though I shared a post on that once, I originally shared this over at NYIP, so HERE.

Have you tried shooting in backlight? It’s tricky, but so fun with practice!
Once a photographer gets comfortable shooting on manual settings in ideal lighting, it’s fun to try to push beyond “easy” and get creative. Backlit photography creates so much emotion, and can take images from standard to stunning! Photography will come alive with a touch of whimsy, romance, and mystery with dream-like images that GLOW. Shooting in full manual mode will give you the most control of your settings. If you shoot in auto, your camera will think it is exposing for the bright light, and leave your subject under exposed.
Here are 5 steps towards great backlit images.
1. It’s all about Location
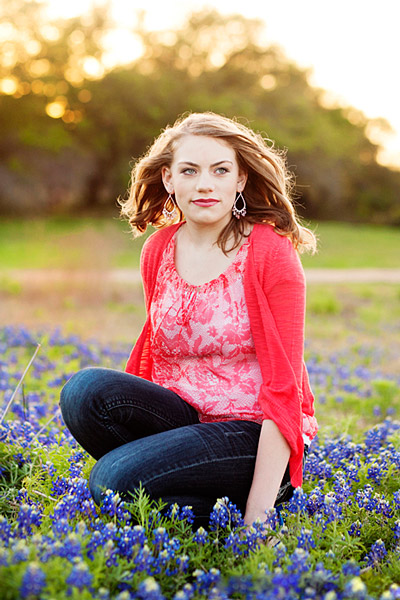
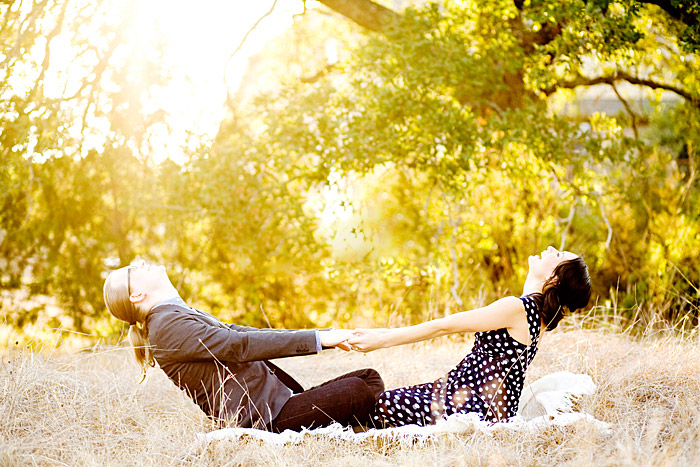
If you are just learning to shoot backlit images, finding the perfect spot will really help you on your way. I’ve found a great spot, not too far from me, that I know works every time the sun is out. I know it’s best in the evening, too. It’s a big open field, and in the distance is a wall of trees to the west. Once you learn to shoot backlit images in a controlled environment, it becomes easier to do in other situations as well. When the sun goes down just below the trees, I’ve found to be the perfect recipe for amazing images. The sun is diffused just a touch by the tree’s, and throws out the golden glow on the entire field. The trees work as a diffuser where it lets the light peek through, but not too much. It looks almost like it’s on fire with the sun beams blurring out the tips of the trees. Standing in just the right angle from the subject helps immensely, and you’ll find this by simply moving around until you get the perfect spot.
2. Time of Day
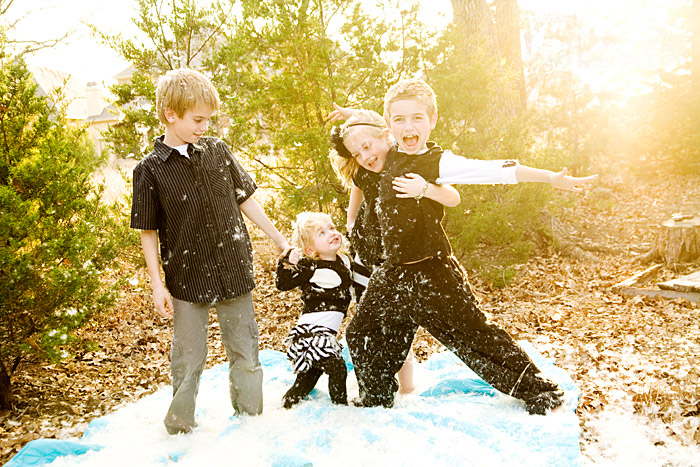
The best times to get lovely backlight glow is just after the sun rises (early morning) or just before it sets (end of the day). When the sun is lower in the sky, as mentioned above, the glow permeates the landscape around it. The sun must be in the background of the subject, which will also show the rim light around the edges of the subject. You may have heard photographers talk about the “golden hour” this is often referred to the end of the day or early morning, when the sun simply glows! If you do choose to try backlighting in full sun in the middle of the day, make sure your subjects are turned so that their faces are in even light, and not towards the harsh rays of the sun. This way you’ll have the rim light behind them and an even exposure on their faces.
3. Focus/Recompose
Focusing with backlight can be tricky. The automatic focus on the lens gets confused with the light coming towards you, so I often tilt my camera down by the subjects waist, set my focus, then move it up towards their faces. This way it doesn’t take too long to grab the focus, and can capture candid moments without much effort. It also helps to get the best exposure with the subject blocking the sun while you grab settings, then you move as needed.
 4. Overexpose just a touch
When your subject is against a bright background, the typical camera settings will often come out underexposed when using the camera meter. By overexposing your settings just a touch, the subject will be darker and more properly exposed for the backlight. In simple terms, darken the shutter speed a few steps above what your exposure level indicator tells you (that’s the little meter/ruler seen when you look inside the camera).
 5. Sun out of view
Don’t shoot directly into the sun. This is a commen mistake when taking back-lit images, and really the main light source of the sun is best left just out of the frame. It will wash out the picture, and take out the details out of the person or object in front. If you have partial sun in the image, it won’t be as harsh, and also better sets up the shot to follow the rule of thirds, too.
 With backlighting, you can read these tips over and over, but you really have to get out there and PRACTICE to really “get it.” So remember these tips, grab your camera, and go give it a try!
If you’d to join the Capturing Joy Photo Club on Facebook, where we have photo challenges, Q&A’s, and image sharing, request to join HERE: https://www.facebook.com/groups/CapturingJoyPhotoClub/